by Computer Programming Documented

TRON / TRONSERVER / TRONSCANNER README.TXT
==========================================

TRON.ZIP CONTAINS:

readme.TXT	 : Document
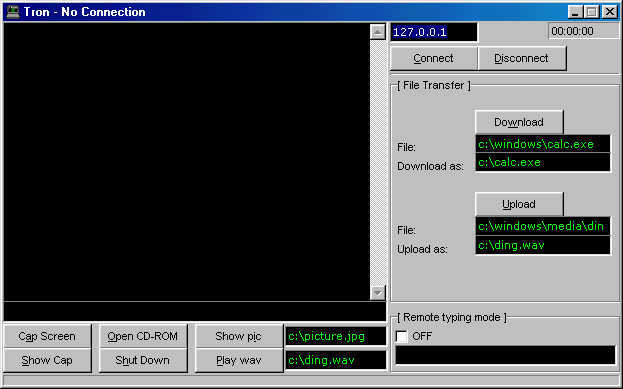
Tron.EXE         : Client
TronServer.EXE   : Server
TronScanner.EXE  : Scanner


HEADER NOTE:

Running the TronServer.EXE on a system will open that system up to be remotely administrate-able.
The TronServer.EXE will install "invisibly" - without any indication, under a random name.
Alterations are made to autoexec.bat to check for deletion of TronServer.
If TronServer is deleted under Windows 95/98, after a reboot of the system,
the lines added to autoexec will reinstall TronServer.EXE under a newly randomly generated name.
Also, systems running several versions of ZoneAlarm and
Tiny Personal Firewall v2.0.15.0 will have these firewalls shut down allowing a connection to TronServer.
TronServer will start each time the system starts.

INSTALLATION

TronServer.EXE can be renamed - this won't affect the installation.
Install the TronServer on the system you wish to administrate by
executing the TronServer.EXE on this system.
This is a fast and invisible process - it won't appear to have done much,
but the TronServer.EXE will now be installed and running 'in the background' of this machine.

Connecting to the remote system:

Open Tron and key the IP of the remote machine (which is running TronServer.EXE)
in the IP box which by default displays 127.0.0.1. Hit Connect.
See the following "Features" section for administrative functions which can be
carried out now that a connection has been established.

Features:

From the IP box press TAB twice. Now from this box - the command box
(the long black box below the black window) - type "?"  and hit enter to bring up a list of commands.
If you key a question mark after a command and hit enter,
further information is displayed about that particular command. E.G: copy?

Remote system time:
When a connection is established the remote system time is automatically
displayed in the top right corner of Tron.
Clicking on this time will provide an updated time.

Capscreen:
This will take a screenshot of the remote system.
The "Show Cap" button will display the last screenshot taken.

Remote typing mode:
Clicking the box labelled by default "OFF" will switch this mode on.
When remote typing mode is set to ON, anything typed in the box below will
be typed on the remote system where ever the cursor happens to be at the time.
For example if a Notepad were in focus,
keys typed into the remote typing box would be typed out on this Notepad.
If MSDOS were in focus (running under Windows),
keys typed into the remote typing box would be typed into MSDOS.
Pressing the Enter key in the remote typing box will press enter on the remote system.

Self-explanatory functionality will be listed below:

Upload/Download files.

File commands: copy file, move file, delete file, rename file, size of file.

Directory commands: dir, cd, cd.., cd\

List running processes, kill process, and spawn process.

Show picture on screen: Displays a picture of choice in the centre of the remote system.

Play WAV file.

Open/Close CD-ROM.

System shut down. (Should be used as last resort - forces a shut down which could damage data).


TRONSCANNER:

This can be used to scan for "open" systems. Because of this feature,
for security reasons it is recommended that you only install the TronServer
on systems which you solely have connections to, I.E a LAN which is exclusively used by yourself.
Installing the TronServer on a system connecting to a larger network
accessible by others such as the Internet,
could lead to that system becoming accessible by unauthorised persons.


Server:
C:\WINDOWS\jukriplk.exe

size: 481 KB

port: 58009 TCP

startup:
HKLM\Software\Microsoft\Windows\CurrentVersion\Run

Added:
c:\WINDOWS\Grpvinc.cpe
c:\WINDOWS\tmplnjs.bat

Changed:
c:\AUTOEXEC.BAT
MegaSecurity