
by TheLord
Written in Visual Basic, compressed with FSG
Released in October 2005


1- Sin Console

This mitre gathers all concerning about number of server connected, their names, their ports... etc..
The case "Sin" is very important ; indeed it's here where you must put the number of the port in which you want to listen on.
This port must be specify during the creation of the server, like it's shown in the mitre "Edit server".
The button "Start Listening" has to be clicked only when you had entered the port in "Sin".
The button "Connection" connects you to the server you selected.
For instance, you want to download a file located on : http://up&run.free.fr/example.exe ;
you must fill the field "URL" WITH the "example.exe", and specify the name of it AGAIN with its extension!
To finish on this mitre we can note that your status (connected or not) is visible in bottom of the screen with also the number of servers available.


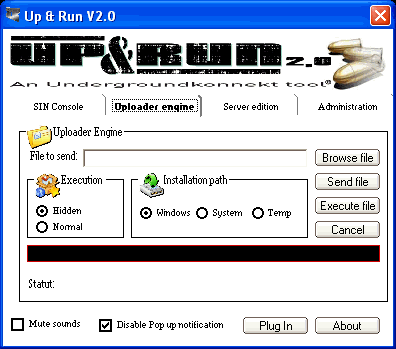
2- Uploader engine

We saw that this features permits to upload data on a server.
To begin, you must specify the file to send by clicking on the button "Browse File".
After that choose the wanted execution type.
Click on "Send file"! The percent of the sending is shown in the black bar. You can stop this sending by clicking on "Cancel".
To finish, you have to click on "Execute file" to execute the uploaded file...


3- Processes

Right here you will be able to observe the processes launched on the remote server. The mitre is composed of several buttons that i will describe.
First of all check that you're connected to a server and also check "Procsys.dll" is uploaded!
Now click on "Get Processes" to receive the list of all processes launched on the remote server.
The button "Sort by name" class them alphabetically, and "Save process log" permits you to save this list in a TXT file.
You can kill a process by clicking on "Kill selected".
The "Check processes" button is pretty interesting,
because with it you can compare the list of the programs launched remotely with a TXT file provided with Up&Run 2.0,
and which contains a great number of names of "interesting" processes,
like KAV, NAV, ZoneAlarm... etc.. With that feature you can easily underline which kind of protection is active in the remote server.
Moreover the button "Add Process to list" adds a name of a process in the TXT file.
Finally, "Googlize process" is a very innovating feature which find for you on Google the name of the process you selected.


4 - Administration

In this mitre are available all the features related to the remote server, with also the means to get basic information, like Windows version, RAM, Processor... etc..
This feature is accessible by clicking on "Server Informations", and "Save infos log" saves this data on a TXT file.
"Restart server" made the server reboot, "Close server" close the corresponded process, and "Uninstall server" remove DEFINITELY the Up&Run 2.0's server.


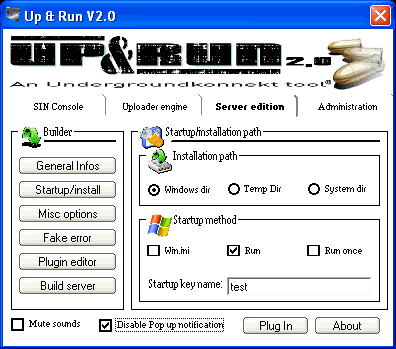
5- Edit Server

That's the mitre which control the settings of a server. Through it you must specify all the information needed. Several windows are available...


Main menu

The most essentials informations must be indicated here.
"Dns/Static IP" must contains your IP adress (static IP) or your DNS up to date with your current IP.
"Listening port" determines in which port the server will try to connect on. Obviously it must be the same port in the "Sin" button.
"Exe name" and "Dll name" indicate the name that the server and the dll will take after being executed. DON'T PUT ANY EXTENSIONS IN THESE FIELDS!


Startup/install

Right here you can configure 2 parameters of the future server : its installation directory and its startup method.
"Installation path" propose these directories : windows, system and Temp.
"Startup method" propose 3 startup methods ; you must choose one, except if you want an infection that will be removed after a reboot.
"Startup key name" must be fill with the name you want to give to the registry key.


Misc options

Several features are available here.
"Melt server after execution" will delete the server after it has been correctly installed in the specified directory.
"Disable Xp restore points service" permits you to desactivate the Xp restoration service.
"Delayed server execution" will delay the startup of the server with the number of seconds you specified.
"Disable Xp default security" do what its name means! ;p


Fake error message

In this window you can configure a message which will be display on the server execution. You can choose few icon for it, and test it with the "Test error" button.


Plugin editor

YOU HAVE TO FILL HOST AND PATH FOR THE SCRIPT, it will result a server crash if you dont.

Build server

By clicking on this button you are abble to generate the server you configured with all the preceding steps.


TheLord


Server:
dropped files:
c:\WINDOWS\test.exe                Size: 74,158 bytes
c:\WINDOWS\system32\testdll.dll    Size: 55,392 bytes

startup:
HKEY_LOCAL_MACHINE\SOFTWARE\Microsoft\Windows\CurrentVersion\Run "test"
data: C:\WINDOWS\test.exe


tested on Windows XP
November 02, 2005
MegaSecurity