Step One: Configure the BO2K Server
-
Alright, once you've unpacked the BO2K distribution into a directory, start up the BO2K server
configuration tool by running the
- Expand the 'Startup' option folder
- Click on the 'Init Cmd Bind Str' and you'll see the current 'binding string' appear in the 'Current Value' box. A 'binding string' is a protocol-independent way to specify where the protocol will be listening. For UDPIO and TCPIO protocols, this is simply a port number. If you were running a Netware/IPX plugin or some other protocol, the binding string would have a different syntax.
- Since the default value of the 'Init Cmd Net Type' option is still 'TCPIO', we'll go ahead and set the port to something like 18006. To do this, type 18006 into the 'New Value' box and hit 'Set Value'. Now, the server is configured to use TCPIO port 18006. Tada.
- To the right of the 'Plugins Loaded:' box, there is an 'Insert...' button. Click it.
- When the 'Insert BO2K plugin' box comes up, choose bo_peep.dll and hit Open.
 tool.
tool.
The configuration program pops up. Now we want to open the BO2K server, the one that we're going to
be installing on the server machine, and configure it. First, make a copy of the BO2K
executable, and open that one by clicking the open server button  and
choosing the proper BO2K.EXE executable from the list of files.
You can configure the built-in system settings, such as encryption keys and default ports by using the tree control at the bottom of the window, and changing the setting on the right. For example, to change to port that BO2K listens on (aka, what BO2K 'binds to'), Do the following:

Now let's do one more thing. Add the BO_PEEP plugin.
-
This is a relatively simple task. Just copy the server to the target machine, and run it. If you're installing
on a Win95/98 machine, the server executable will move itself into the c:\windows\system directory
and name itself 'UMGR32.EXE'. The name is configurable with the BO2KCFG tool that we just used. There are other
things you can do to customize how BO2K behaves upon installation. A fuller description of these
options are available in the Command Reference section of this website. If you are installing under Windows NT, BO2K copies itself into the c:\winnt\system32 directory (if permissions
allow it to do so) and renames itself.
That's it. Wasn't very difficult, was it...
-
First start the client by running the
 tool. It should open, and
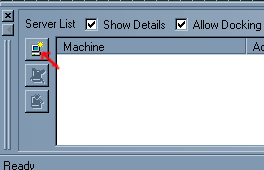
maximize itself. First things first, we want to create a new server connection. So we click
on the little computer button in the left hand side of the server list window at the bottom.

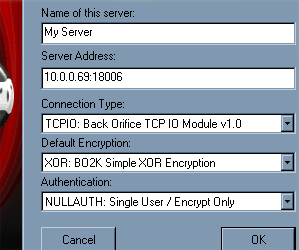
This pops up a dialog where you can define the parameters of the machine that you want to contact.
You'll want to put in a name for this connection (doesn't matter what it is) in the 'Name of this server' field.
Next, put in the server's IP address:port pair. We have to specify the port, since we reconfigured the server,
and didn't change the defaults for the client. So we type in aaa.bbb.ccc.ddd:18006, replacing the letters
with the real IP address of the server. Connection type should be TCPIO, encryption should be XOR, and authentication
should be NULLAUTH. When you're done, hit 'OK'. 
One you've hit OK, the server command client pops up for this server. You can minimize and restore the server command client by double-clicking the server name in the server list box at the bottom.
-
Since we installed the BO_PEEP plugin in the server, in order to communicate with it properly,
we need to install the same plugin into the client. To do this, we go to the 'Plugins' menu option and
the choose 'Configure...'.
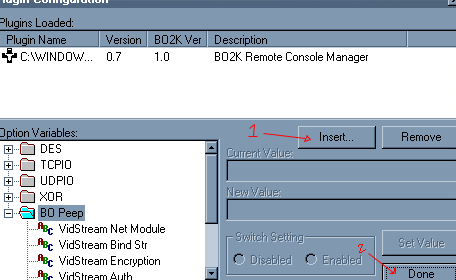
This pops up a dialog to insert and remove plugins and configure basic setting, much like the BO2KCFG tool, but this time it's for the client. This dialog also doesn't modify any executables. It stores the configuration in the registry.
So, we hit the 'Insert...' button and choose the bo_peep.dll file. This adds the BO_PEEP plugin
and puts the options in the tree control below. We didn't reconfigure BO_PEEP on the server side, so we won't
have to configure it here. Just hit 'Done'.
-
Simply hit the 'Connect' button on the Server Command Client. It should sit there for a second, and then
spit out the version number of the server it has connected to in the output window at the bottom
of the command client. After connecting, you can pick commands out of the 'Server Commands' tree control.
When you choose a command, the parameters for the command will appear in the right of the box.
Some parameters are optional, as indicated by either brackets [], or something like (opt).
All other parameters must be filled in with valid values.
To send a simple ping command, open the "Simple" folder in the tree control, and click on the 'Ping' command. Now, click on the 'Send command' button. If the ping was successful, a ping reply message should be issued from the server, and will appear in the output window.
-
To use the plugin, go to the Plugins menu option, and you'll notice that there is now a
'BO Peep' submenu. This was added when you inserted the plugin into the client. Select the
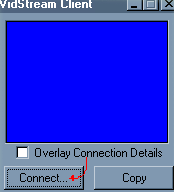
'VidStream Client' sub-menu item. It should pop up a happy little blue box.

Before we can connect, though, we need to start the VidStream service on the server side. So we go to the BO Peep folder in the server command client's command list, open it, and choose the "Start Vidstream" command. A number of options will appear. Type the value '8' into the FPS box. Type '160,120' in the 'Xres,Yres[,NET][,ENC][,AUTH]' box. Then hit 'Send command'. The server should respond, telling you what address you need to connect to in order to get the video stream.
Click on the connect button on the VidStream client, and you'll be presented with a connection dialog. The number in the box is the default VidStream port. Modify the address to include the appropriate IP address (as returned by the server). Such as: aaa.bbb.ccc.ddd:15151. All of the other options should be their correct defaults. Hit the OK button and you should connect. If you mistyped something, got the port/address wrong, or picked the wrong network type/encryption/crypto-key, then it won't connect. But it all goes well, you'll see a little window into the other machine's desktop. Congrats.
Well that's it for the tour, you should be able to figure out lots of other things on your own!